I hate to admit it, but when I first started using programming for predictive analytics, I was super disorganized. Which model performed best again? Guess I gotta go back and run all my cells in my "modelling notebook" over again... and clean them all up. GUILTY. 🙋♀️ It was pretty evident to me that my work flow was unsustainable. But how to improve?
I initally thought about logging my activity in a txt file. But, could I always be trusted to remember? Plus, I had to plan out a schema. There had to have been something better. This is why I was so excited to learn about mlflow.
What is mlflow?
mlflow allows you to iteratively experiment. It organizes you and keeps your work transparent, reproducible, scalable, and portable.
On the most basic level, the mlflow Tracking module turns your workflow into experiments that have runs. This brings some scientific rigor to our approach. We can apply various "treatments" and compare the results. mlflow will even serve up a clean user interface so that we can explore our work visually.
Getting Started
I'll run through a basic workflow using the famous seattle housing prices dataset, predicting whether the home is on the water or not. mlflow is available via pip or conda.
There's certainly quite a bit of flexibility in how you set up your environment; you can declare one programmatically or via the command line. If you set the MLFLOW_EXPERIMENT_ID environment variable, all the runs will infer the experiment id. Runs can be executed one at a time using with, or or individually - you could have multiple runs going on at the same time.
In this experiment, I'll be using the sklearn framework, but the developers are building out frameworks for tensor flow & keras, gluon, xgboost, lightgbm, and spark. I'm declaring everything programmatically here.
import mlflow
import mlflow.sklearn
There's a separate import statement for the sklearn module, which is specially tailored to log and implement sklearn models.
Experiment!
- Build, munge, explore, and analyse your data. Plan out how you will tackle the task at hand.
- Initialize an experiment with a name and the directory where we want to store everything. This could also be done via the command line.
exp_id = mlflow.create_experiment("houses", artifact_location= "./houses_artifacts") - Now you can go one of two ways...
- Use
with
If you modularize everything out, you can write a function that executes the run all at once.
def log_logit(experimentID, run_name, params, X_train, X_test, y_train, y_test):
      with mlflow.start_run(experiment_id=exp_id, run_name=run_name) as run:
If going this route, you'll pass your params to your model using(**params). - Start and end each run manually.
Usemlflow.start_run(experiment_id, run_name), log your model, parameters, metrics, and artifacts, thenmlflow.end_run()once you're done. This is how the code below is laid out. If you go this route, you can also nest runs.
- Use
Logging
Here's where we get into the mlflow. Take for example my inital run. After splitting my data into the usual train/test, I dump all of my features into my first model, get my preds, f1 score, and plot the confusion matrix. I want to log all of these things as a run.
# run model
logit1 = LogisticRegression(penalty='l2', solver='lbfgs', max_iter=1000)
logit1.fit(X_train, y_train)
preds = logit1.predict(X_test)

# get metrics
f1 = f1_score(y_test, preds)
confusion = confusion_matrix(y_test, preds)

# plot the confusion matrix
fig, ax = plt.subplots()
sns.heatmap(confusion, cmap='Blues',annot=True)
plt.ylabel("True labels")
plt.xlabel("Predicted labels")
title = "Confusion Matrix"
plt.title(title)
Now, I call mlflow.start_run(experiment_id=exp_id, run_name="naive backwards") and start recording all of my assets for this run.
With the tracking module, we can log;
- the models themselves
- model parameters
- metrics
- artifacts, and
- tags (a key value pair, set using
mlflow.set_tag(), not shown here)
# log model
mlflow.sklearn.log_model(logit1, "ridge logit")

# log params individually
mlflow.log_param('penalty', 'l2')
mlflow.log_param('solver', 'lbfgs')
mlflow.log_param('max_iter','1000')

# log metrics
mlflow.log_metric("f1", f1)
t_n, f_p, f_n, t_p = confusion.ravel()
mlflow.log_metric("true neg", t_n)
mlflow.log_metric("false pos", f_p)
mlflow.log_metric("false neg", f_n)
mlflow.log_metric("true pos", t_p)

# log the confusion matrix plot as an artifact
fig, ax = plt.subplots()
sns.heatmap(confusion, cmap='Blues',annot=True)
plt.ylabel("True labels")
plt.xlabel("Predicted labels")
title = mlflow.active_run().info.run_id + " Confusion Matrix"
plt.title(title)

# log confusion matrix to temp file
temp = tempfile.NamedTemporaryFile(prefix="confusionmatrix-", suffix=".png")
temp_name = temp.name
try:
  fig.savefig(temp_name)
  mlflow.log_artifact(temp_name, "confusionmatrix.png")
finally:
  temp.close()
Rise and repeat, or modularize everything out a la step 3.1 above.
Comparing results
Once you've completed your runs to your satisfaction, rev up your shell. In your working directly, run mlflow ui. Point your browser to localhost:5000 and you should see the user interface, which allows you to explore your results. Alternatively, the tracking uri can be set to point to a remote server via an env variable or set_tracking_ui().
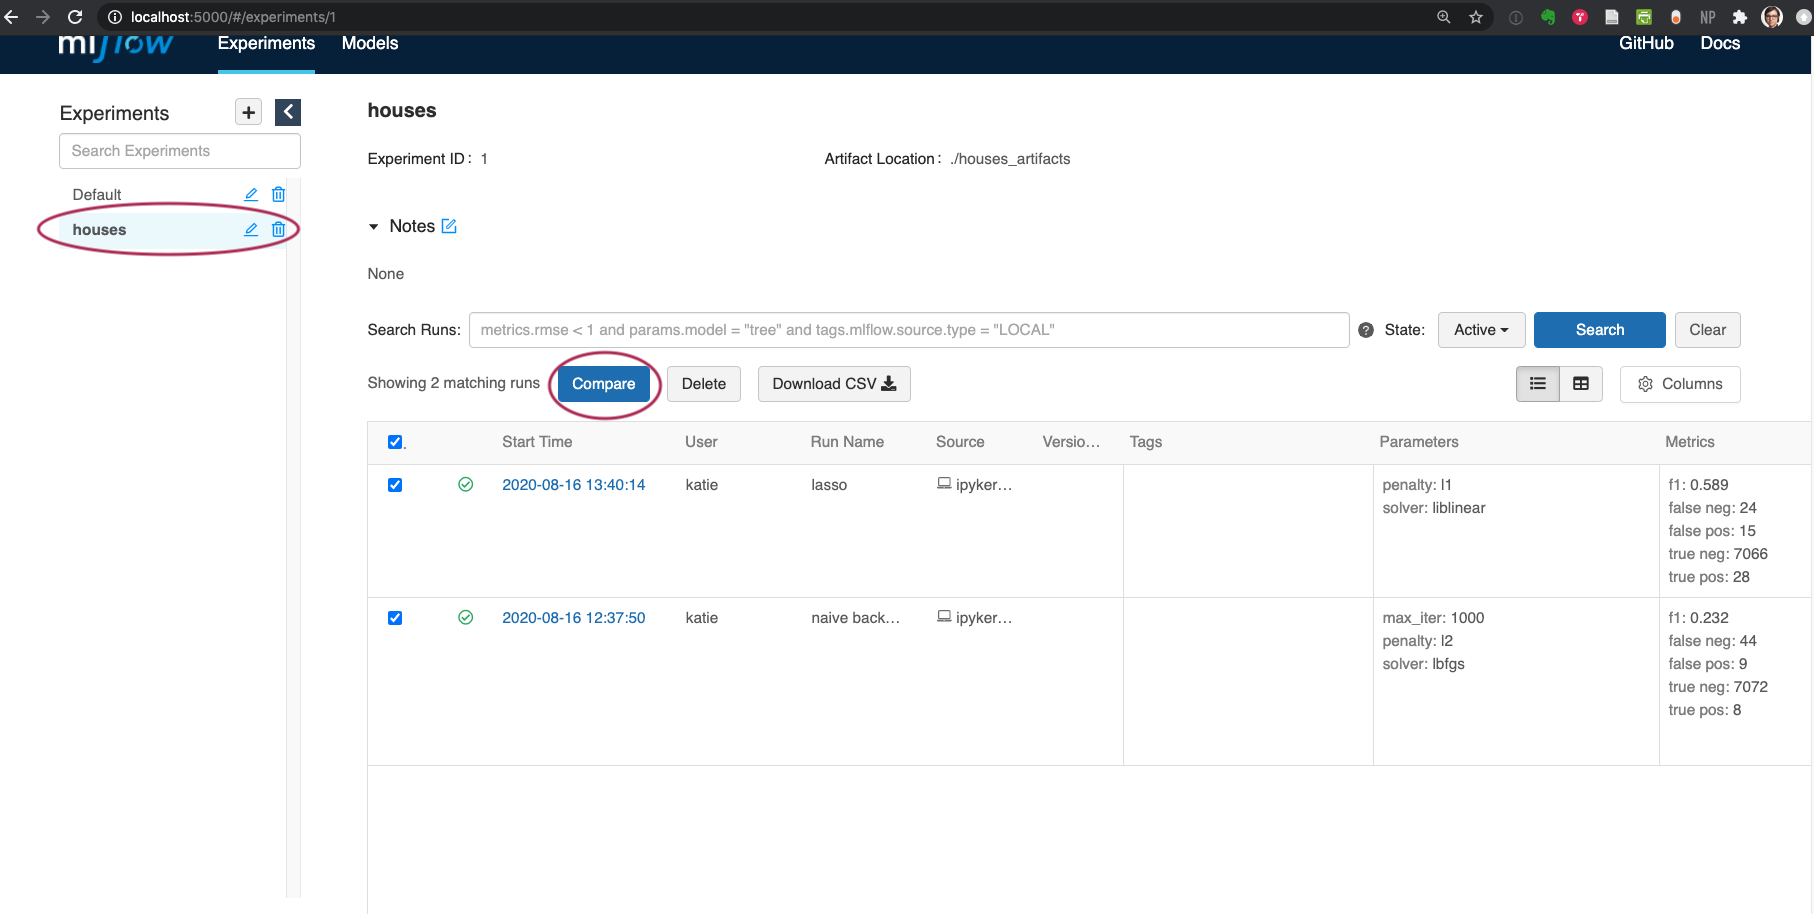
On the left hand side, all of your experiments in the workspace are listed. At the top, I can add my own notes about the experiment. Tags will appear here as well. In the screen shot above, you can see my two previous runs listed in the table. I can download them all to a csv, or use the 'compare' button at the top of the table which allows for a side-by-side, metric-by-metric comparison, including some built in contour, scaling, and parallel coordinate plots for chosing the best model for your question at hand.
Pro Tips
-
Get creative with your artifacts
If we try hard enough (or just 🥒 enough), artifacts can be anything... including images, models, and even data files
-
Use tempfile ↗ for temporary file & directory handling
In the example above, I turned a matplotlib fig object into a tempfile, logged it in mlflow, and then closed the file. No messy clean up locally 👍🏼
-
Before starting, consider your meta data such as run names and tags
"Naive backwards" and "lasso" may initially be informative names but with further development may not be as appropriate.
Even more functionality...
Additional features include a module for packaging up your tracking workflows, model deployment, and a ~model registry~. But those are topics for another day.